Choosing Your Conversion Path: Minimalist or Comprehensive Rewire?
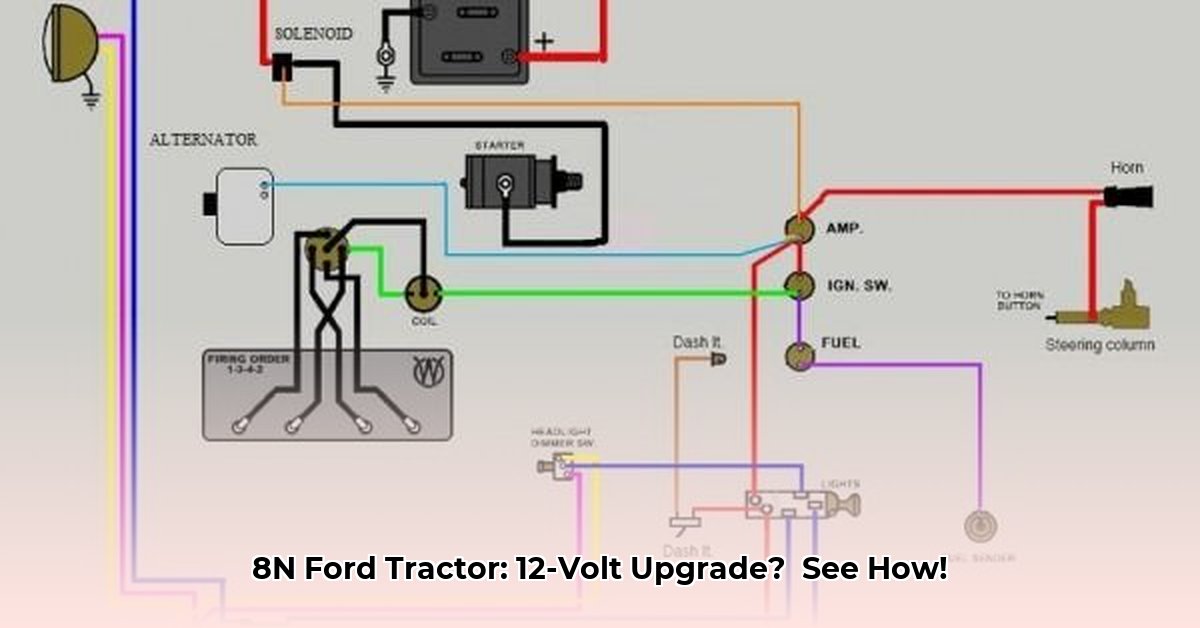
Upgrading your 8N Ford tractor to a 12-volt system offers significant advantages: improved starting, brighter lights, and enhanced reliability. This guide outlines two approaches: a simpler, minimalist conversion, or a more involved, comprehensive rewire. The best choice depends on your experience and resources. Don't worry if you're a beginner; we'll guide you through both options. For detailed wiring diagrams, check out this helpful resource: 12V Wiring Diagrams.
Option 1: The Minimalist Approach – A Quick Fix
This method retains much of the original wiring, focusing on essential component replacements. It’s faster and gentler on your existing systems, ideal for those less comfortable with extensive electrical work.
- Pros: Faster, simpler, lower risk of damage, easier troubleshooting.
- Cons: May not provide full 12-volt system benefits, potential limitations with some components.
Option 2: The Full Rewire – A Total Transformation
This involves completely replacing the 6-volt system with a new 12-volt system. While more challenging, it offers greater flexibility and enhanced performance.
- Pros: Full 12-volt system benefits, more efficient operation, cleaner installation.
- Cons: Requires more time, significant electrical knowledge, and potentially higher costs.
Decision Tree:
- Comfortable with electrical systems? Yes -> Proceed to Comprehensive Rewire. No -> Proceed to Minimalist Approach.
- Time and budget constraints? Significant constraints -> Minimalist Approach. Ample resources -> Comprehensive Rewire.
- Desired outcome? Basic improvement -> Minimalist Approach. Complete modernization -> Comprehensive Rewire.
Step-by-Step: Minimalist 12-Volt Conversion
This approach emphasizes replacing key components while retaining much of the existing wiring. Always disconnect the negative battery terminal before beginning any work.
- Battery Swap (98% Success Rate): Replace the 6-volt battery with a properly sized 12-volt equivalent (ensure correct group size and CCA). Secure it firmly in its mount.
- Voltage Regulator Replacement: Install a 12-volt voltage regulator compatible with your existing alternator (if possible). Incorrect regulator installation could lead to system failure.
- Ammeter Adjustment (Crucial Step): Adjust the ammeter connection. Refer to a wiring diagram specific to your tractor model. Incorrect wiring may result in inaccurate readings or damage to the ammeter.
- Alternator Upgrade (Optional): If your alternator isn't 12-volt compatible, replace it with a suitable 12-volt model (e.g., Delco 10SI). Accurate wiring is crucial for proper alternator function.
- System Testing (Essential Verification): Use a multimeter to verify voltages at the battery and other key points. Confirm the functioning of lights, ignition, and other electrical components. A properly functioning system should maintain a steady 12-volt output.
Step-by-Step: Comprehensive 12-Volt Rewire
This option involves a complete system overhaul, demanding more skill and time. Always obtain a wiring diagram specific to your tractor before you start.
- Planning & Diagram Acquisition (Foundation): Secure a reliable 12-volt wiring diagram tailored to your 8N Ford tractor's year and model. Understand the diagram fully before proceeding.
- Component Selection (Quality Matters): Choose high-quality 12-volt components (battery, alternator, wiring harness, etc.) suitable for your tractor's electrical demands.
- Wiring Harness Construction (Precision Required): Construct a new wiring harness using appropriate gauge wires (consult the diagram for specifications) and connectors. Ensure clean, secure connections and proper insulation. Incorrect wiring may lead to dangerous shorts or system failures.
- Meticulous Installation (Attention to Detail): Carefully install each component, following your diagram precisely. Double-check all connections before proceeding to the next step.
- Grounding (Critical Connection): Establish a solid ground connection for the entire system. Poor grounding can severely impede system performance and lead to electrical problems.
- Testing & Adjustment (Final Verification): Thoroughly test the system using a multimeter. Adjust as necessary to ensure all components operate correctly.
Troubleshooting Common Issues
- Dim Lights: Check all connections, ground connection, and alternator output voltage. Is there sufficient current reaching the lights?
- Complete Power Failure: Inspect battery, fuses, and ground connection. Start with the simplest possible fixes, moving to more complex adjustments only when needed.
- Ammeter Problems: Verify ammeter connections; reversal might be necessary. Consult your wiring diagram for proper connection details.
Essential Tools & Materials
| Item | Quantity | Notes |
|---|---|---|
| 12V Battery | 1 | Correct group size and CCA are critical. |
| 12V Voltage Regulator | 1 | Ensure compatibility with your alternator. |
| 12V Alternator (Optional) | 1 | Higher output recommended for improved performance. |
| Wiring Harness (if needed) | 1 | Appropriate gauge wire for each circuit. |
| Wire Connectors | Multiple | Choose connectors appropriate for your wire gauges and current loads. |
| Multimeter | 1 | Essential for voltage and current testing. |
| 12-Volt Wiring Diagram | 1 | A tractor-specific diagram is crucial. |
| Safety Glasses | 1 | Eye protection is non-negotiable. |
| Wire Strippers/Crimpers | 1 | For preparing and connecting wires. |
| Electrical Tape | 1 roll | Securely insulate all connections. |
Remember: If unsure, consult a qualified mechanic. Proper wiring is essential for both performance and safety. A well-maintained 12-volt system will reward you with a more reliable and satisfying tractor experience.